Providing Invitations to Users
Inviting users is the first step to getting your team up and running on GetThru. Whether you’re launching a texting or calling campaign, invitations give users access to the tools they need. This guide covers how you can send invitations via an email or a link, what roles users can be assigned, and how to troubleshoot common issues.
TABLE OF CONTENTS
- Users and Invitations
- Email Invitations
- Permanent Invitation Link
- Accepting Invitations
- Invitation Status
- Troubleshooting Common Issues
Users and Invitations
While this guide details the process for inviting users to your account, if you want to review information for handling your account's current users, please check out our guide User Management.
Email Invitations
You can send an email invitation to invite one or more users by entering their email addresses manually or uploading a CSV file.
Sending an Invitation
Begin by selecting Create New Invitation from the 'Users' drop-down menu:

From the New Invitation page, you can input your users email addresses and submit the invitations.

- Email Field: This can be one email address or a comma separated list of email addresses.
- Email CSV File: This is a CSV file of email addresses in one column that does not exceed 50,000 rows. Make sure your file includes a header for the email column and contains only valid email addresses without extra characters (like < or >).
- Role: After you’ve added emails or uploaded a CSV, choose a role for all invitees. All users invited in a single batch will be assigned the same role.

- Send Invitation: Select this button to submit your invitation.
Invitations will generate an email to all invitees giving them a link to click on to begin the account setup process.
For new users, the email will have the subject line 'Invitation' and the following content:

For existing users, the email will have the subject line 'Invitation for [Account Name] and the following content:

Permanent Invitation Link
If you’d prefer not to send email invitations, you can enable a permanent invitation link. This link can be shared with users to join your account directly, without needing an individual email.
Begin by selecting Permanent Invite from the 'Users' drop-down menu:

Enable or Disable the Permanent Invite Link
To add the Permanent Invite link to your account, click the Enable Permanent Invite button:

Once the link is enabled, you can select the generated link to share with users.
- Copy Link: You can click Copy Link to add the generated link to your clipboard.
- Delete: You can click Delete to delete the link. The previous link will be broken once deleted. If you re-enable your link, it will generate a brand-new link. Any documentation where you might share the link with your senders will need to be updated.

- Invitations - Copy Link: After enabling, you can also access the Permanent Invite link from the Invitations page under the Users drop-down:

This option only adds users with the User role. It cannot assign elevated roles like Moderator, Admin, or Account Owner. However, you can update a user’s role later from the Users page. Check out Permission Levels for more details.
Accepting Invitations
When users click on the invite in an email invitation or click on the permanent invitation link, they'll be taken through the process for joining the organization account. The process for accepting invitations within the GetThru system differs between new users and existing users with a profile.
Please review the following guides for details on the next steps for each type of user:
- Review our Join a New Organization and Create a Profile guide
- Review our Join a New Organization with an Existing Profile guide
Invitation Status
Emailed invitations and cancelled permanent invites will have a listing of that invite's current status. The following statuses may be seen.
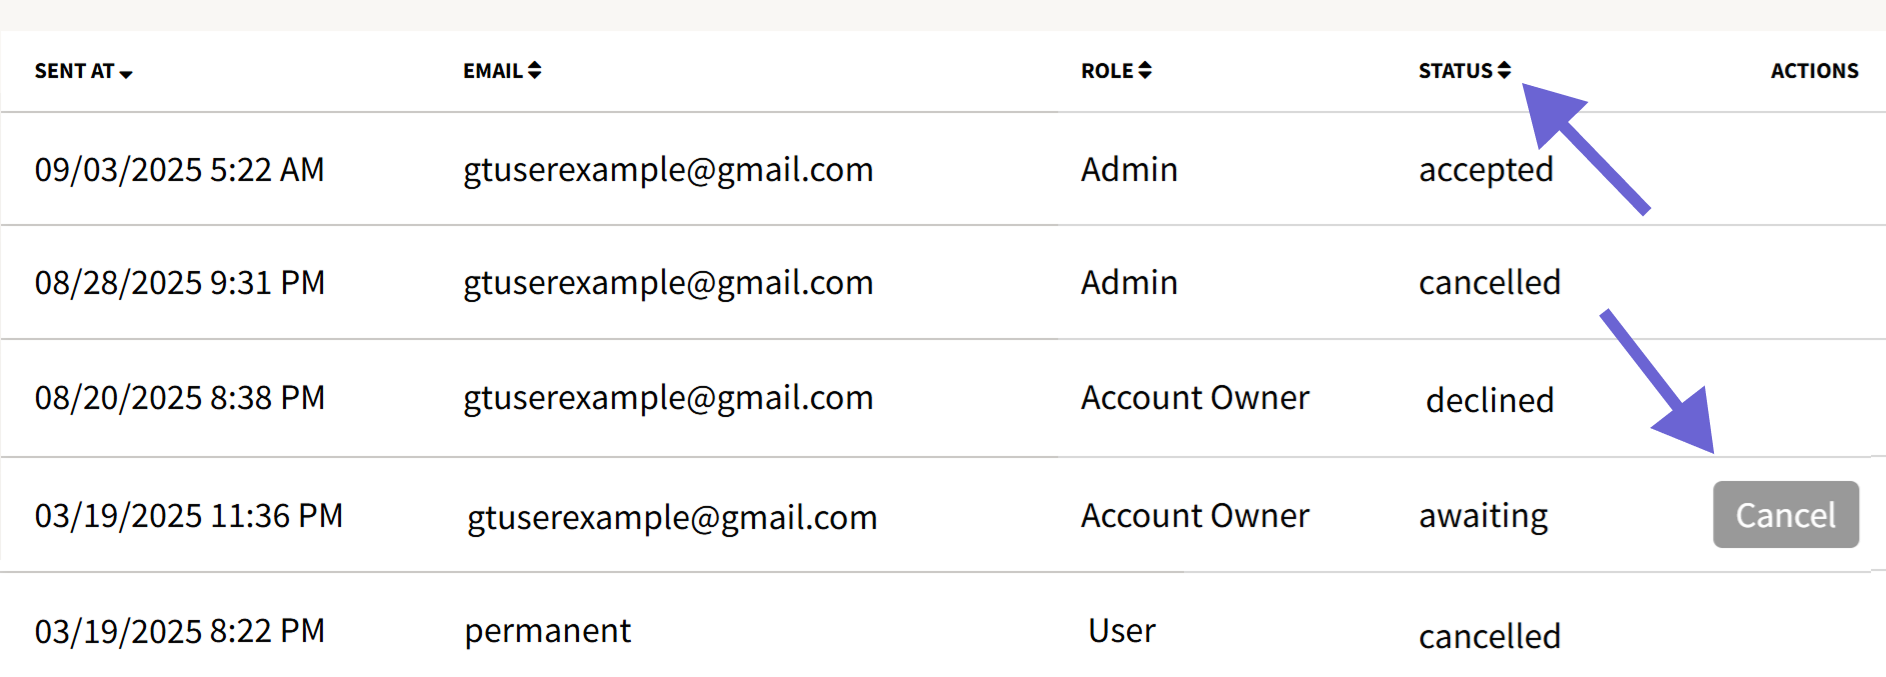
- Awaiting: The invitation has been sent to the user, but they have not yet accepted or declined it. Invitations in this state can be cancelled via the Cancel button.
- Cancelled:
- Email invitations: The cancel button was clicked to void the invitation to the user. They will not be added to the organization account and the email invite will no longer be active.
- Permanent invite: The permanent invite link was deleted from the Permanent Invite page.
- Declined: The user declined the invitation. They are not added to the organization account and the email invite is no longer active.
- Accepted: The user accepted the invitation and is now an active user within the account.
Troubleshooting Common Issues
If you encounter an issue during the invitation process, there are a few troubleshooting steps you can check into.
- If you don't receive the email invitation, check your spam folder, additional folders (such as a promotion folder), and any email filter settings. If difficulties continue, please write to support@getthru.io with the affected email.
- If a user cannot find their email invitation, you can use the cancel option for the invitation and resend them a new invite that will be at the top of their inbox.
- Some may use shared computers to log into GetThru; for example, when attending in-person text-a-thons or phone banks. If using shared computers, make sure to log previous users out, clear browsing data, or open new browser windows in incognito mode. Failure to do so may cause confusion when inviting new users or accessing assignments.
If having further difficulty with the invitation system or logging in, please review our Troubleshooting Issues at Login/Signup guide. If you need further assistance, write to support@getthru.io with any questions.